Q: Why does CashBook ask for KYC when Google Pay doesn't?
If you've signed up for CashBook and hit a KYC step, you've probably had this thought: "I've been using Google Pay for years and they never asked me for this. Why does CashBook need my documents?"
It's a completely reasonable thing to wonder. And the answer has nothing to do with being overly cautious or making things difficult for you. It comes down to one core difference in how these two products actually work.
Google Pay links to your bank. CashBook issues you a wallet.
When you set up Google Pay, you're connecting it to a bank account you already have. That bank already verified your identity when you opened the account. Your Aadhaar, your PAN, your address, all of it. Google doesn't need to collect that again because the bank already has it and has already done the work.
CashBook works differently. We issue a UPI wallet directly to you or your team members. There's no bank account sitting behind it that has already run verification. We are the ones issuing the financial instrument, which means under RBI regulations, we are directly responsible for verifying who holds it.
This is an RBI requirement, not a product choice.
CashBook's UPI wallets run on Obopay's UPI on PPI infrastructure, which holds the RBI license to issue prepaid payment instruments. Any entity that issues wallets is legally required to complete KYC before a user can transact.
We don't hold this data beyond what's required. We share it with RBI as part of our compliance obligations, and we are legally answerable for any fraudulent activity on wallets we've issued. KYC is how we fulfil that responsibility.
Q: What happens if you skip it?
Without KYC, your wallet stays in a limited state. You can explore the app but you won't be able to transact. This isn't us being restrictive. It's a hard regulatory limit. We legally cannot activate a wallet for someone whose identity hasn't been verified.
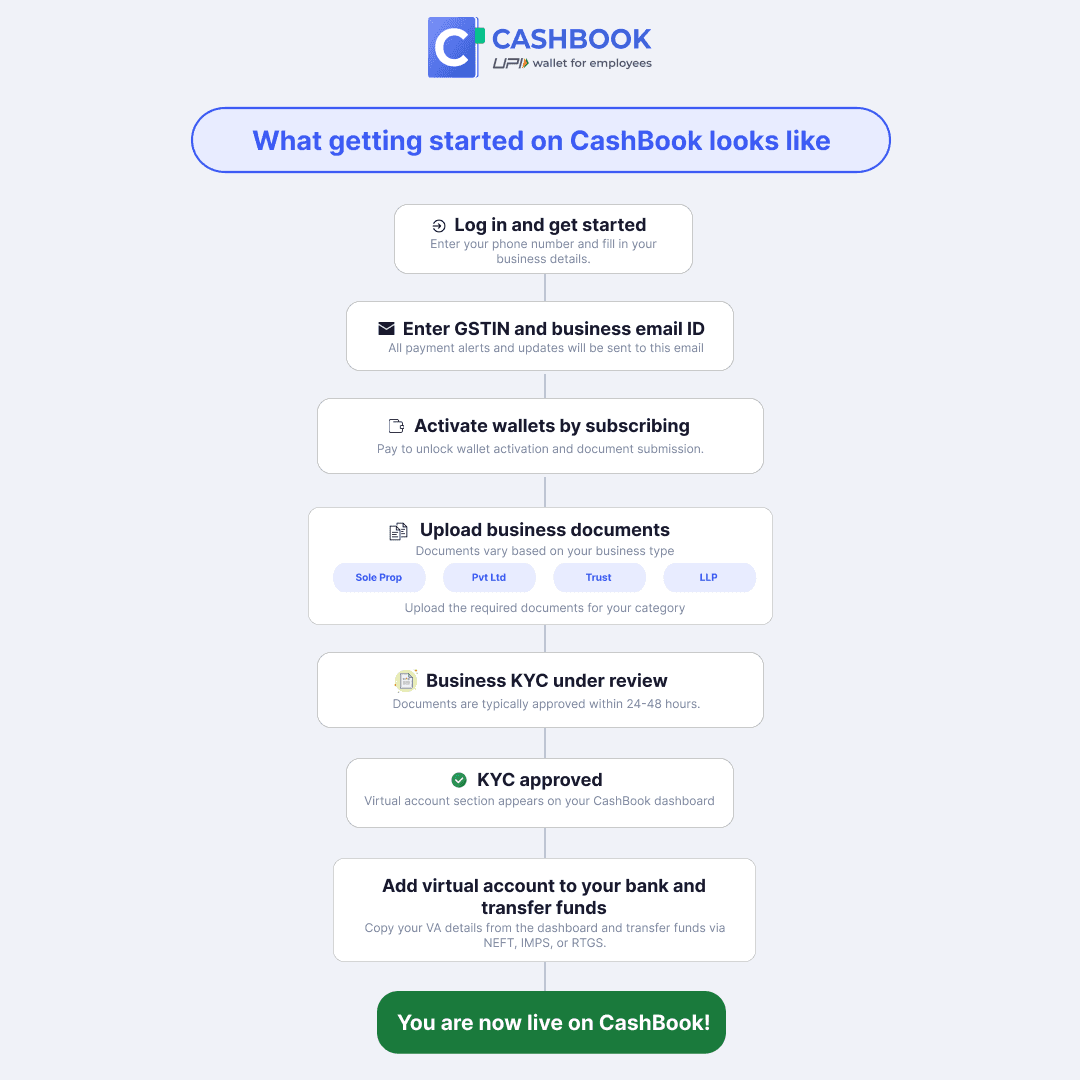
There are actually two separate KYC steps, depending on your role.
If you're the business owner or primary admin, you go through business KYC first.
This is a one-time verification of your company details. Once it's approved, you get virtual account details. You add this virtual account as a beneficiary in your existing current account, and that's how you load money into CashBook. Transfer via NEFT, IMPS, or RTGS from your current account to the virtual account, and that balance is what you then distribute to your employee wallets.
For employees or anyone who will actually use the wallets, there's a separate individual KYC.
This involves submitting your Aadhaar and PAN, uploading photos for verification, and completing a short video KYC call. Once that's done, the wallet gets activated and the employee can start transacting.
Both steps exist for the same reason. RBI requires identity verification at every level before a financial instrument can be activated.
The process itself is quick. The video KYC call takes a few minutes to complete. Wallet activation typically happens within 24 to 48 hours after that.
Business KYC verification also takes around the same time once submitted. And once you start loading money from your current account to the virtual account, it follows standard banking transfer timelines depending on whether you use NEFT, IMPS, or RTGS
If you have questions about the process or ran into an issue during verification, reach out to us at support@cashbook.in and we'll sort it out.